Submit Data to OSDR
Data Submission Guide
If you have any questions during the data submission process, please contact the OSDR Curation team at arc-dl-osdr-data@mail.nasa.gov.
Summary of guidelines for Data Submission to OSDR
Note: If you have a NASA-funded study, and you have not yet filled out a Research Data Submission Agreement (RDSA), please contact OSDR at arc-dl-osdr-data@mail.nasa.gov. Your RDSA will be used to create your study. If you already have an RDSA, your experiment record will have a study associated. You can create more studies as needed.
Step 1: Review a Dataset
First, review one of the existing datasets in OSDR to become familiar with the format such as OSD-48 (animal), OSD-38 (plant), or OSD-554 (microbe)
Step 2: Create an Account
Follow the instructions in the creating_a_nasa_guest_account tutorial to create an account to submit data in the OSDR Submission Portal, the Biological Data Management Environment (BDME).
Step 3: Review Submission Tutorial
Before submitting your data, review the Biological Data Management Environment (BDME) Tutorial section below.
Step 4: Create a Study
Following the Biological Data Management Environment (BDME) Tutorial, create a study or studies.
Note: OSDR recommends organizing non-plant studies by organism and tissue type and plant studies only by organism. If your submission contains data from more than one tissue type, please create a new study for each tissue. Failure to do so could lead to delays in curation, as well as an incomplete list of DOIs to include in your manuscript.
Step 5: Enter Metadata and Upload Data Files
OSDR organizes metadata into sample-level information and assay-level information. Data files are uploaded into the workspace and can be associated with each study.
Note: For file names, please use common acronyms as defined on the Open Science Abbreviations page, whenever possible. If your data has acronyms, scientific terms, or column names that need to be defined, please include a data dictionary with your study. An example data dictionary can be found in dataset OSD-618 (Files > Novel Object Recognition > Data Dictionary Files).
Data Submission Portal
The Biological Data Management Environment (BDME) is a web-based system that accepts submission of data and respective metadata from space-relevant experiments including spaceflight and ground-based analog experiments.
Logging into BDME: To get started, use your NASA guest account to login to BDME. If you do not have an account, follow the instructions in the creating_a_nasa_guest_account tutorial. Please note the NASA Guest Accounts are not managed by the OSDR team. Any issues must be reported to the NASA Enterprise Service Desk (ESD). NASA ESD can be reached 24/7 at 1-877-677-2123.
OSDR submission console
After logging into BDME, you will see the OSDR submission console as pictured below.
Data Submission Console Features
The data submission console allows users to review their RDSAs and experiments (a series of studies, usually grant-level related), and to create, track, and review OSDR studies (the scientific data).

OSDR Submission Console
The OSDR Toolbar: Links out to the “OSDR Home page”, “Data & Tools”, “Research & Resources”, “Working Groups” and “Help” menus.
Dashboard and User Profile: Click on “My Dashboard” to navigate to and refresh your dashboard. Click on the person icon to edit your user profile or logout.
Help and Create New: Link to the BDME help menu and button that allows users to create a new study.
Dashboard Navigation Menu: Allows users to navigate to their RDSAs, Experiments, and OSDR studies.
Studies Dashboard: Allows users to navigate to studies in specific stages of submission.
All: Shows all studies.
Submitted: Only shows studies that have been submitted.
In Curation: Only shows studies currently in curation.
In Review: Only shows studies currently in review.
Public: Only shows studies that are currently publicly available on the repository.
Private: Only shows studies that are currently private (not available to the public).
Biological Data Management Environment (BDME) Tutorial
How to Create a New OSD Study
1. Click on the

button in the top right-hand corner of the page.
2. Select “Create a Study”.
In this example the data is not from a NASA-funded grant, which is highlighted in blue, so the user can click “Next” to create their new OSDR accession number.

Select Factor
3. Choose a factor: Select a factor from the drop-down list that best describes your study and then click “Let’s get started.” If you do not see a factor that describes your study in the drop-down menu, click the “Other” button to email the curation team for review.
In this example, the user has selected “Gravitropism”.

There is nothing to do on the next screen, just click “Let’s get started”.

Upload Raw Data
5. Raw data files are required but can be uploaded later. If you plan to upload your raw data files at a later time, select “I will upload files later” then click “Next”.

6. Upon creating a new study, an OSD accession number and DOI are automatically assigned for your study. These identifiers can be used when submitting manuscripts for peer review. When you see this screen, a new study has been successfully created and you can start curating your research using the OSDR metadata standards.

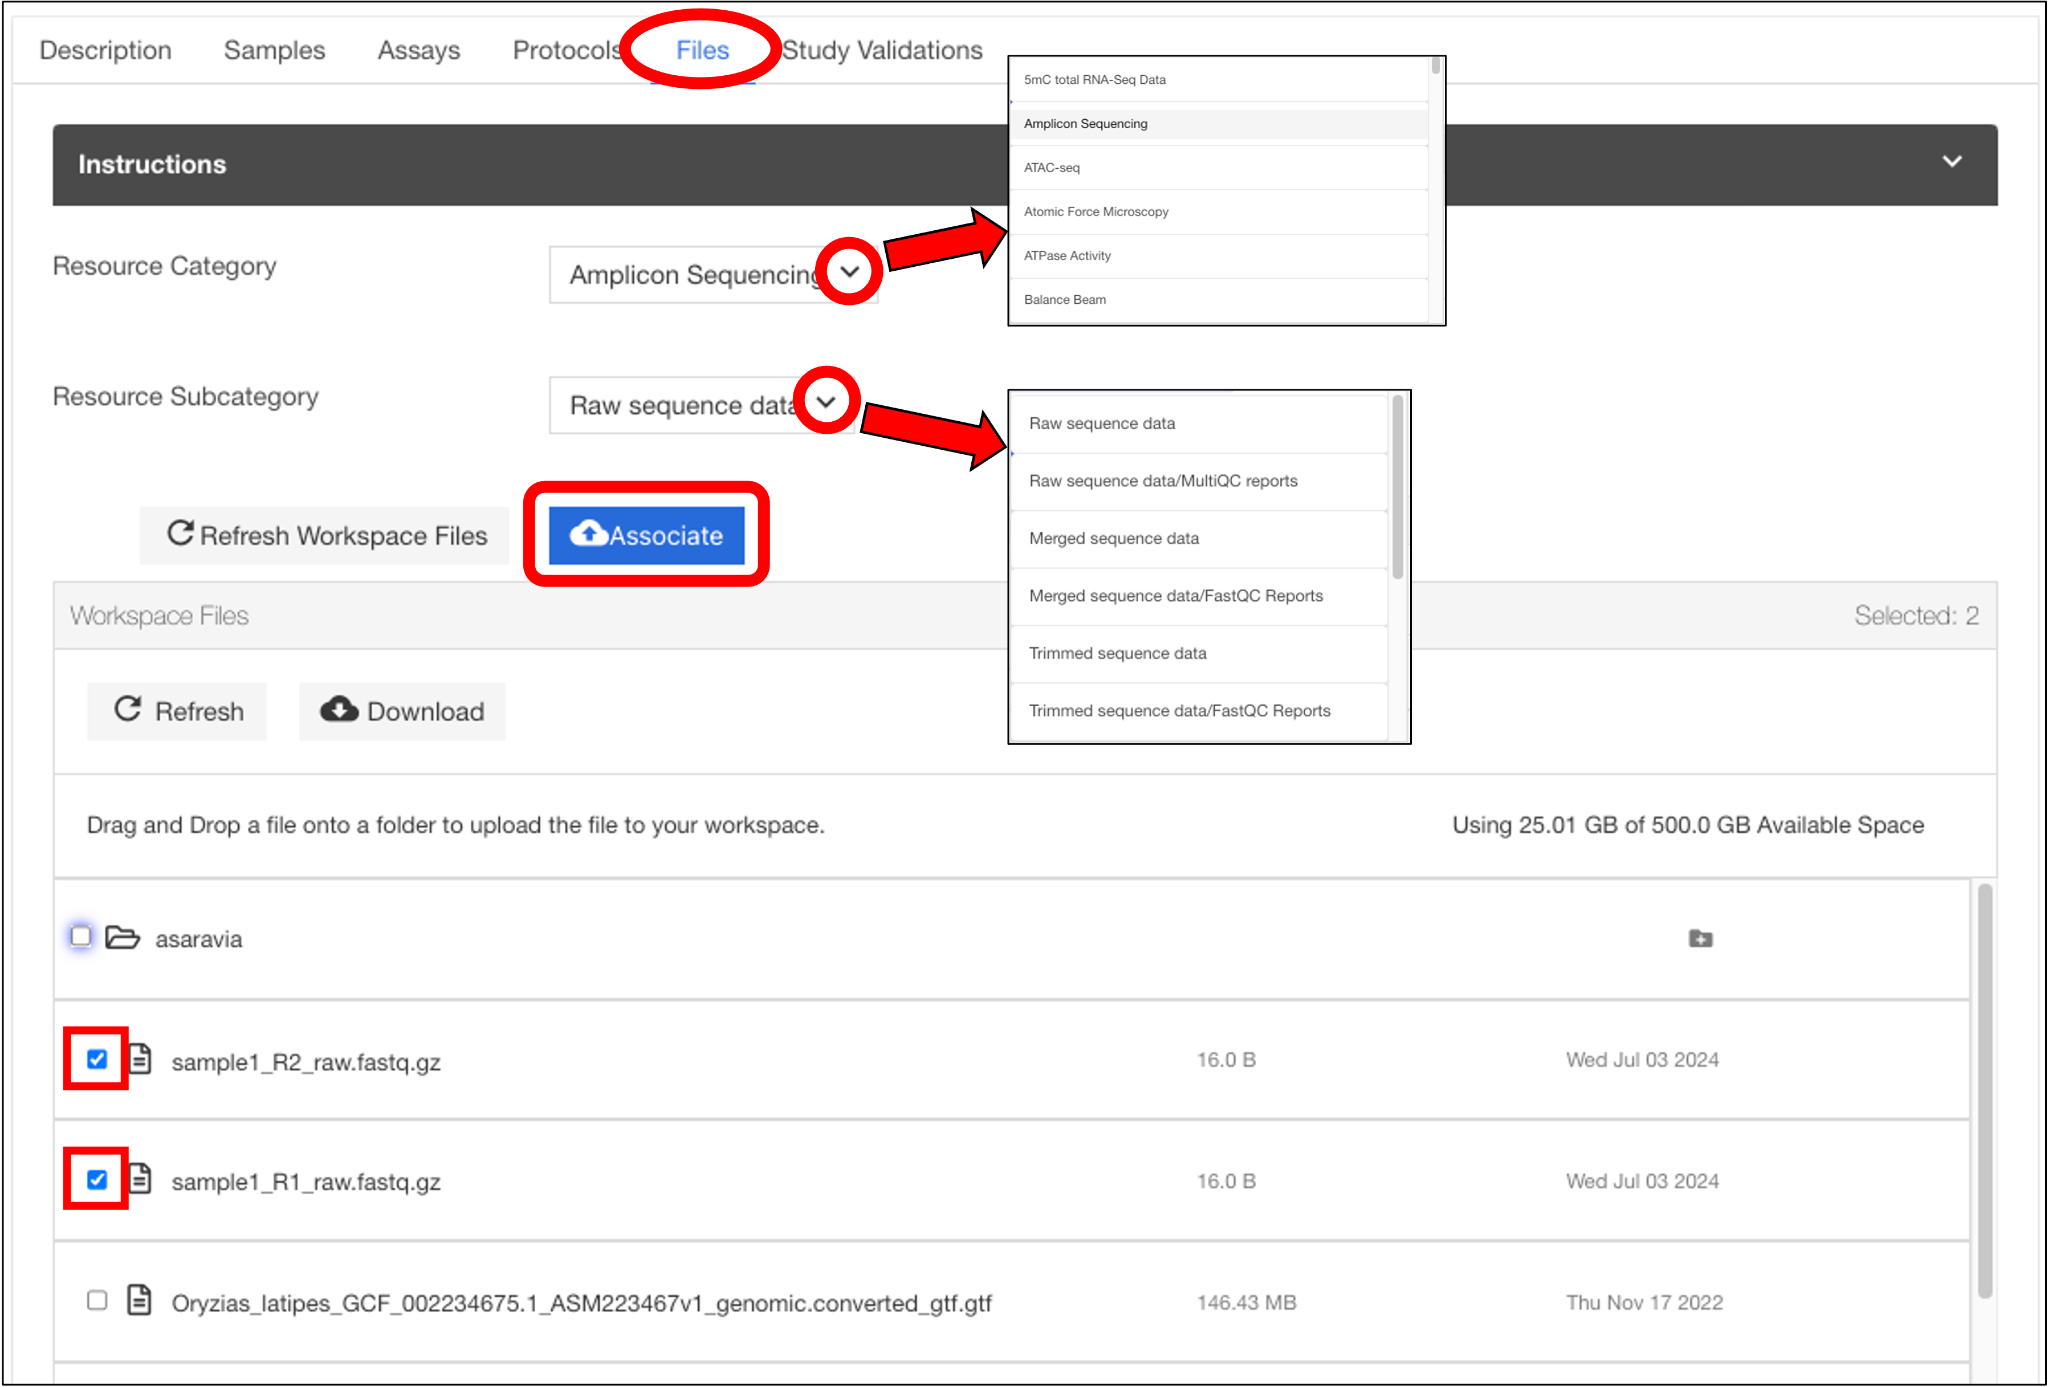
7. Upload study files from your workspace. If you did not upload your raw data files in step 5 above, they can be uploaded at this step. Follow the instructions to select the Resource Category and Subcategory (if applicable) from the drop down-menu(s) that describe your files. Then select the files to be associated from your workspace and click the “Associate” button.
Note: If you do not have files in your workspace, they can be added directly at this step by dragging and dropping them in one of your workspace folders or you can follow the instructions here to login to your workspace and upload files.

When you have completed uploading all files for all assays associated with your study, click “Next” at the bottom of the page.
Note: If you are not ready to upload files at this time, you can skip this step for now by clicking “Next” at the bottom of this page.
Add study-level info
8. Select a Study Design Descriptor. Click the “+ Add” button in the Study Design Descriptor field then start typing a word or phrase that best describes your study. A drop-down menu will appear with controlled ontology terms for you to select from. If you do not see an appropriate descriptor come up, select “add more terms”.
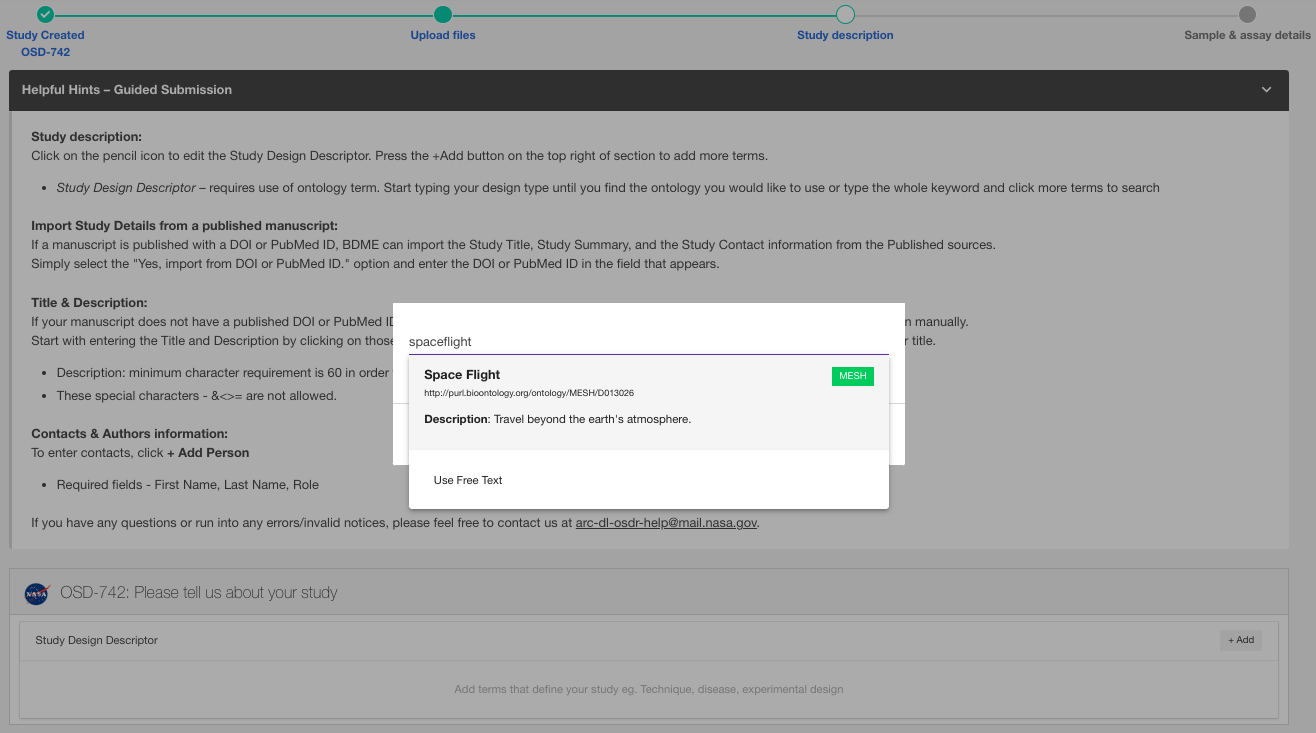
9. Input study title, description, contacts, and associated manuscripts. If your study is already associated with a publication, this information can be added automatically by importing the publication DOI or PubMedID. If your study is not yet published, this information must be entered manually.

Add Sample and Assay info
10. You are now ready to enter your assay- and sample-level information. There are 2 ways to proceed from here:
Option 1: Use the Guided Submission interface to input your assay- and sample-level metadata. Follow the steps in 10.1 below to continue with this option.
Option 2: Download the sample metadata template and appropriate assay metadata templates to input your sample- and assay-level metadata, respectively and submit the completed sample-level and assay-level metadata templates to OSDR Curation at arc-dl-osdr-data@mail.nasa.gov. Follow the steps in 10.2 below to continue with this option.
Option 1: Use the Guided Submission Interface
10.1.1 Add assay(s).
Click the “+ Add Assay” button to select the Measurement, Technology type, and Platform that were used to generate your data, then click the “+ Add assay type” button to add the assay to your study.

10.1.2 Input protocol details.
Click the “Add / edit details” button, then select “Protocols” in the pop-up window to input sample- and assay-level protocols.

Once complete, click the “Next” button to add samples and sample-specific info.
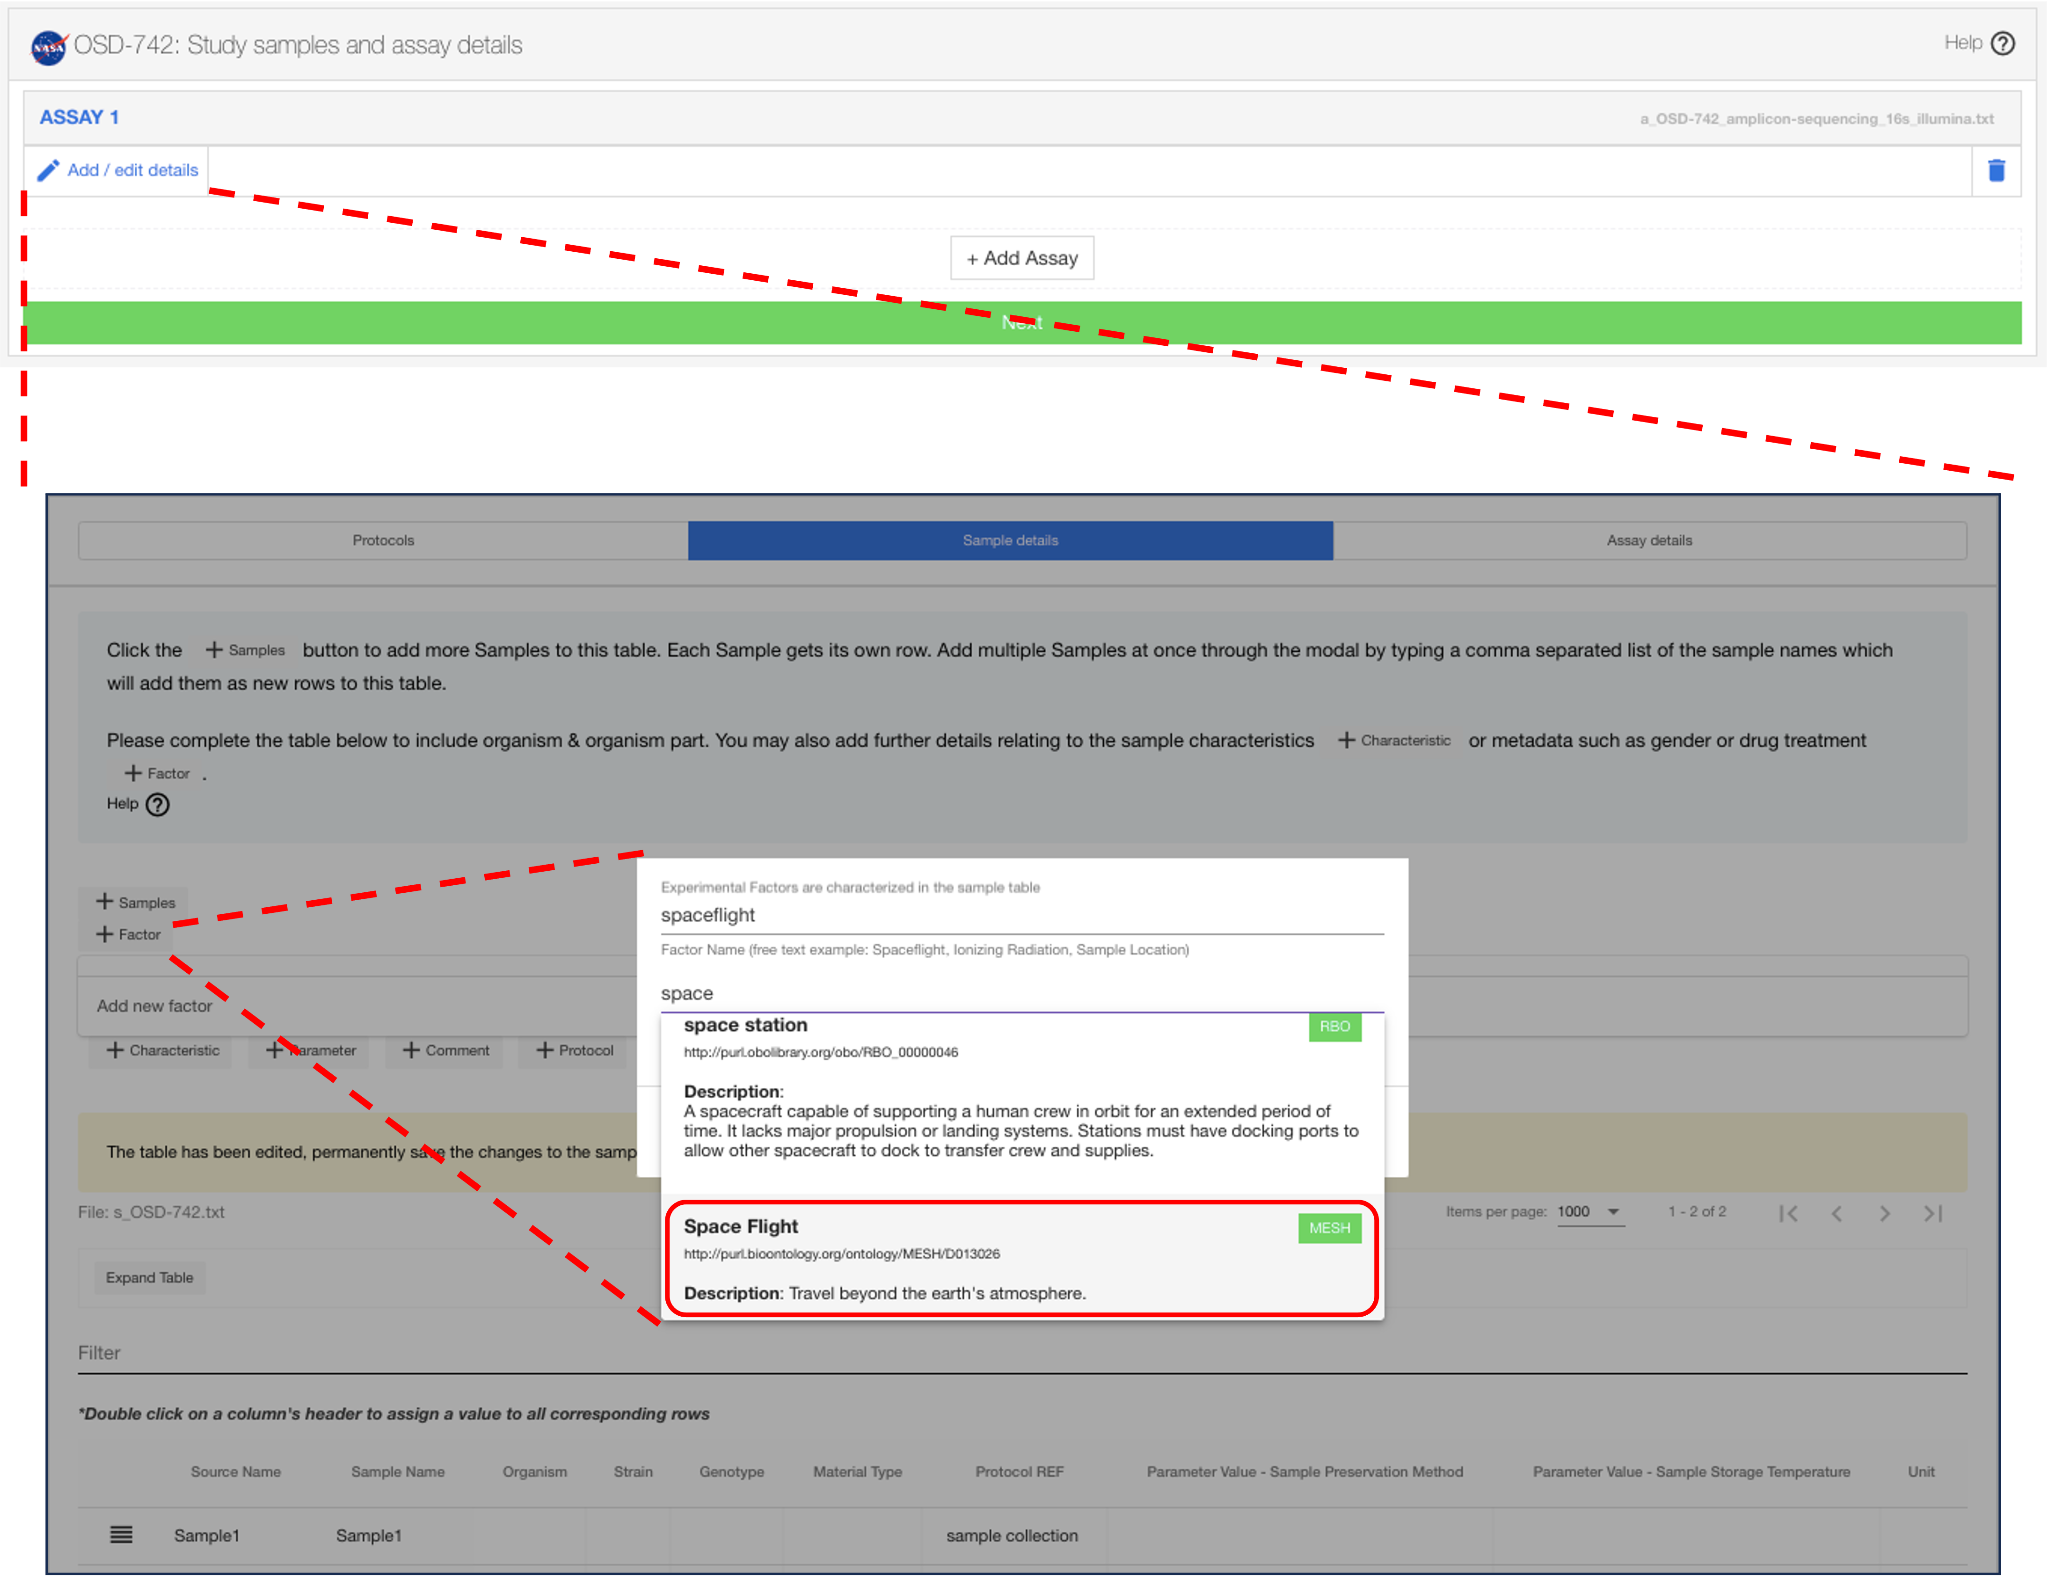
10.1.3 Input sample details.
10.1.3.1 In the “Sample details” pop-up window, click the “+ Samples” button to add samples to each row of your sample table. For each sample, select all relevant assays then click “Add”.

10.1.3.2 Next, click the “+ Factor” to add a factor column to your sample table, start typing your factor column name then select the relevant controlled ontology term from the drop-down menu that appears (click “more terms” to see additional ontology terms).
10.1.3.3 Repeat step 10.1.3.2 to add additional Characteristic, Parameter, Comment, and Protocol columns by clicking the “+ Characteristic”, “+ Parameter”, “+ Comment”, and “+ Protocol” buttons, respectively. Use the controlled ontology terms when naming new columns.
10.1.3.4 For each column (i.e. metadata field) in the sample table, double click on the cell for each sample and input the appropriate value. Start typing the value name then select the relevant controlled ontology term from the drop-down menu that appears (click “more terms” to see additional ontology terms). Note: The “Term Source REF” and “Term Accession Number” columns associated with each metadata field will automatically get populated upon selection of a controlled ontology value name.

10.1.3.5 Check all cells of the sample table to ensure all cells are populated (click the “Expand Table” button to view all columns, if expanded the button will change to “Compact Table”).

Once complete, click the “Next” button to add assay-specific info for each sample.
10.1.4 Input assay details.
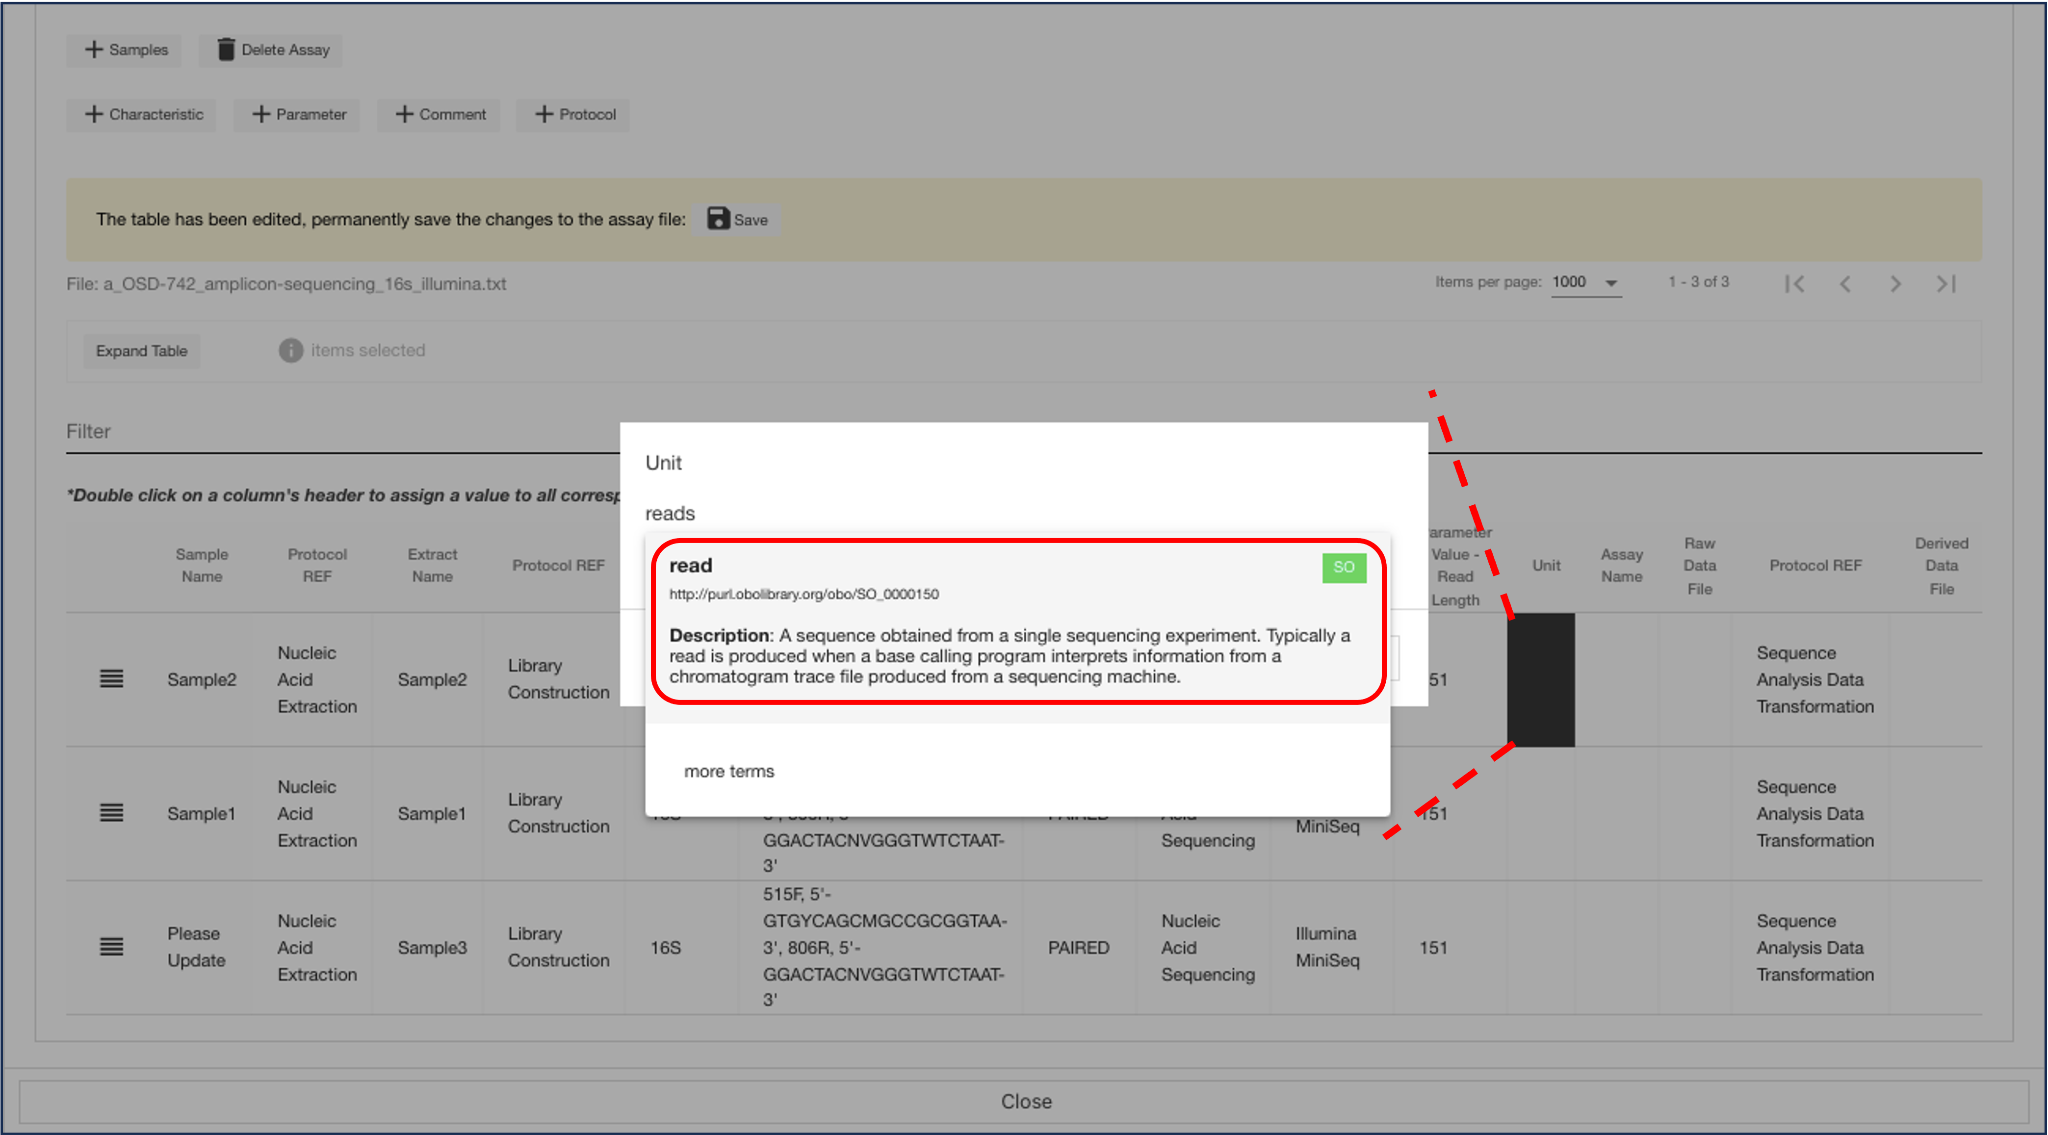
10.1.4.1 In the “Assay details” pop-up window, the assay table will be populated with column headers that describe your assay and a row for each sample. Fill in the assay information by double clicking on the cell for each sample and input the appropriate value and respective units. Start typing the name of the value or unit then select the relevant controlled ontology term from the drop-down menu that appears (click “more terms” to see additional ontology terms), if no terms are relevant use free text to add your value or unit.

10.1.4.2 If you need to add additional samples, characteristics, parameters, comments, or protocol reference columns to the assay table click the “+ Samples”, “+ Characteristic”, “+ Parameter”, “+ Comment”, or “+ Protocol” button, respectively.
10.1.4.3 Check all cells of the assay table to ensure all cells are populated (click the “Expand Table” button to view all columns, once expanded the button will change to “Compact Table”). Then, click the “Save” button to save all changes.

10.1.4.4 Once all cells have been populated and the assay table has been saved, click the “Close” button at the bottom of the pop-up window. Then click “Next” to transition to the full study view, click “Confirm” on the pop-up window that appears.

Option 2: Download the Sample and Assay metadata templates to input sample- and assay-level information
10.2.1 Sample table template.
10.2.1.1 Go to the General Study and Sample-Level Metadata Templates google drive. If your study is from a spaceflight experiment, double click on the “Spaceflight Studies” folder. If your study is from a ground-based analog experiment, double click on the “Ground Studies” folder. Find the Sample Table template that best fits your study design and organism and click the download button to download the template.

10.2.1.2 Once downloaded, open the template in excel and go to the “General” tab. Input your study details starting with the OSD-# assigned to you after step 5 above. Hover over the cells in column A to view the definition for each metadata type. Whenever available, use the controlled ontology terms from the drop-down menu that appears in the cell.

10.2.1.3 Go to the “Sample Table” tab. Input your sample details for each column listed. Hover over the column headers to view the definition for each sample metadata type. Whenever available, use the controlled ontology terms from the drop-down menu to populate the values in each cell. If needed, add additional columns to include additional Factors, Characteristics, Parameters, Comments, and/or Protocols.

10.2.1.4 Save your completed Sample Table excel file. This will be sent to curation along with your completed Assay Table(s) described below.
10.2.2 Assay table template: non-omics.
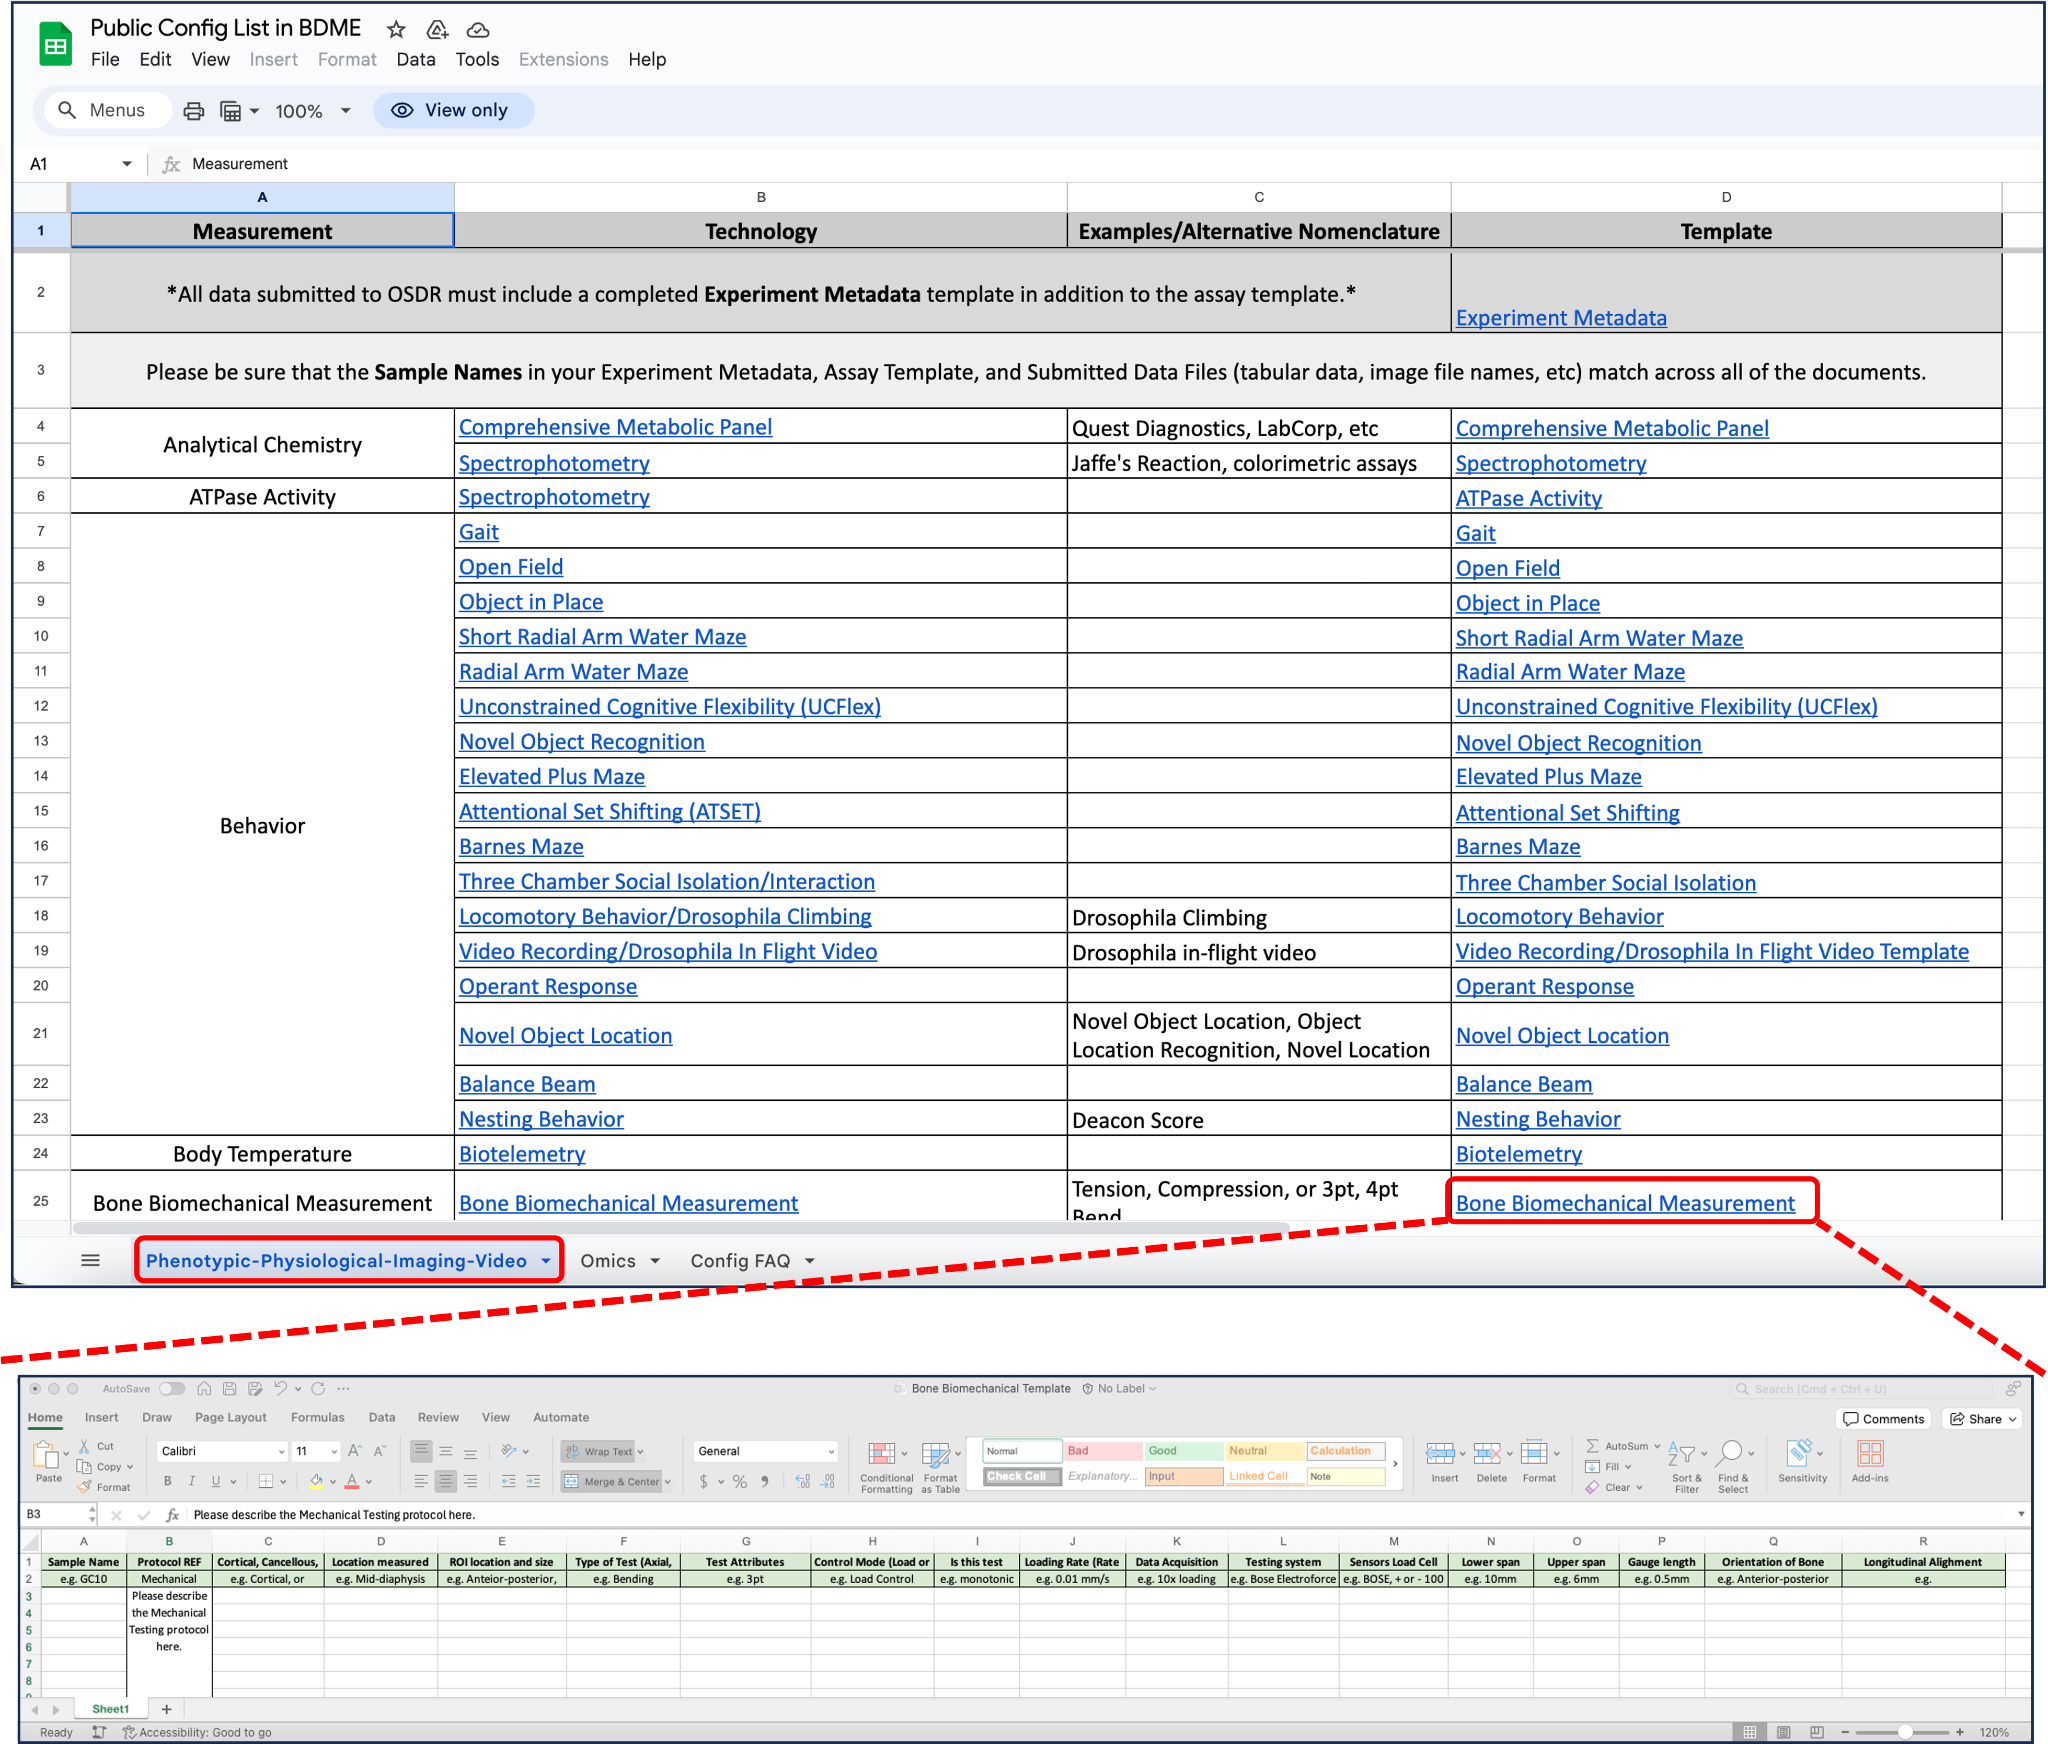
10.2.2.1 Go to the Public Config List in BDME, which also has Assay Specific Metadata Templates in google sheet formatted links. For non-omics data, click on the “Phenotypic-Physiological-Imaging-Video” tab. Column B is the ‘Technology’ content for each assay standard, which are living documents and developed-vetted by OSDR Analysis Working Group subject matter experts. Column C contains alternative naming for assays (common vs lab short-hand). Column D contains the Assay Metadata Templates as described next.
10.2.2.2 In the “Phenotypic-Physiological-Imaging-Video” tab of the Assay Specific Metadata Templates google sheet, find your assay type in the “Template” column then click on the link to download the respective metadata template. Use the examples provided as a guide to fill in the assay details in each column for each sample. If you can not fill out certain metadata columns in the template, leave it blank.
10.2.2.3 Save your completed assay metadata excel files.
10.2.2.4 Repeat steps 10.2.2.2 - 10.2.2.3 for each non-omics assay associated with your study.
10.2.3 Assay table template: omics.
10.2.3.1 Go to the Public Config List in BDME, with the Assay Specific Metadata Templates in individual google sheets. For omics data, click on the “Omics” tab and find your assay type in the “Template” column then click on the link to download the respective metadata template.
10.2.3.2 Hover over the column headers in the assay table to view the description for each assay metadata type. Whenever available, use the controlled ontology terms from the drop-down menu to populate the values in each cell. Specify your OSD-# in cell 2A. Use the examples provided as a guide to fill in the assay details in each column for each sample.

10.2.3.3 Save your completed omics assay metadata excel file.
10.2.3.4 Repeat steps 10.2.3.1 - 10.2.3.3 for each omics assay associated with your study.
10.2.4 Upload completed sample and assay tables.
10.2.4.1 Upload your completed sample and assay tables to your workspace and e-mail the OSDR curation team indicating your OSD-#(s) and the sample and assay tables in your workspace associated with each study.
10.2.4.2 The OSDR curation team will notify you when your sample and assay metadata have been added to your study in BDME.
10.2.4.3 Log in to BDME and on your Dashboard, click on the “Study overview” button for your OSD-# to navigate to the full study view.

Study Overview
In the study overview, you have a full view of all aspects of your study and you can add missing information that was skipped in previous steps or modify information such as the study title, description, contacts, and publications.

Navigate to the Description section of the study overview and modify or complete missing study information including Study Design Descriptor, Factors, Project Details, and any related reference data including Project Link(s), Payload(s), Mission(s), and Data Source (only if your data are already published on another database).
Note: Required fields that are missing are indicated in red.

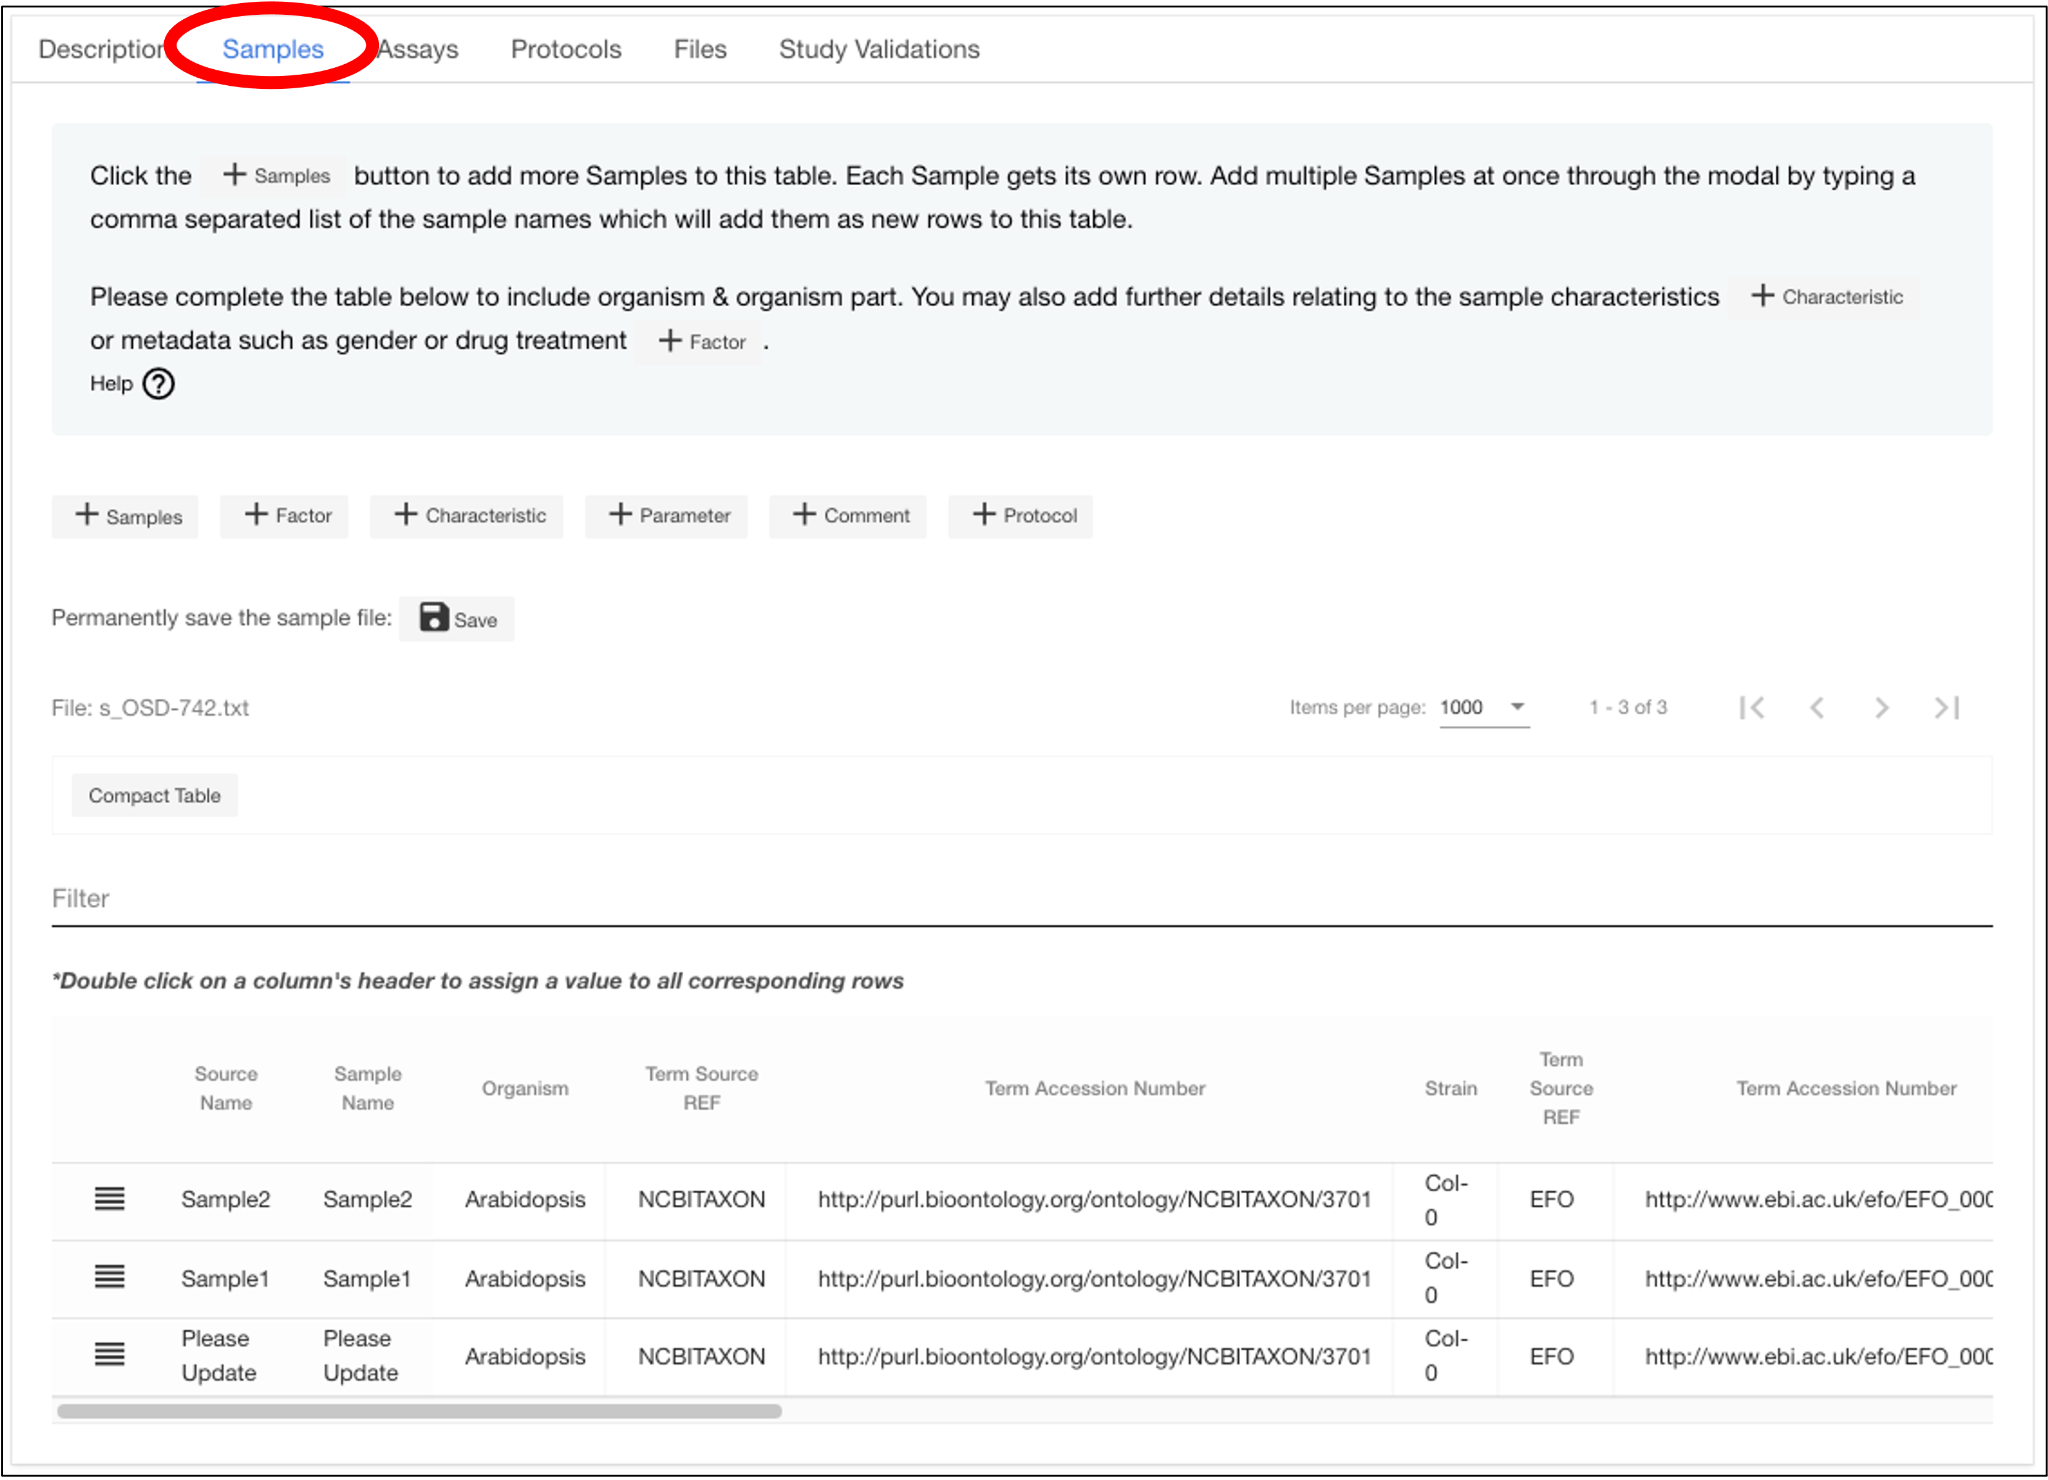
Navigate to the Samples section of the study overview and modify or complete missing sample-level information in the sample table.
Note: Whole columns and rows can be copy and pasted from an external template.
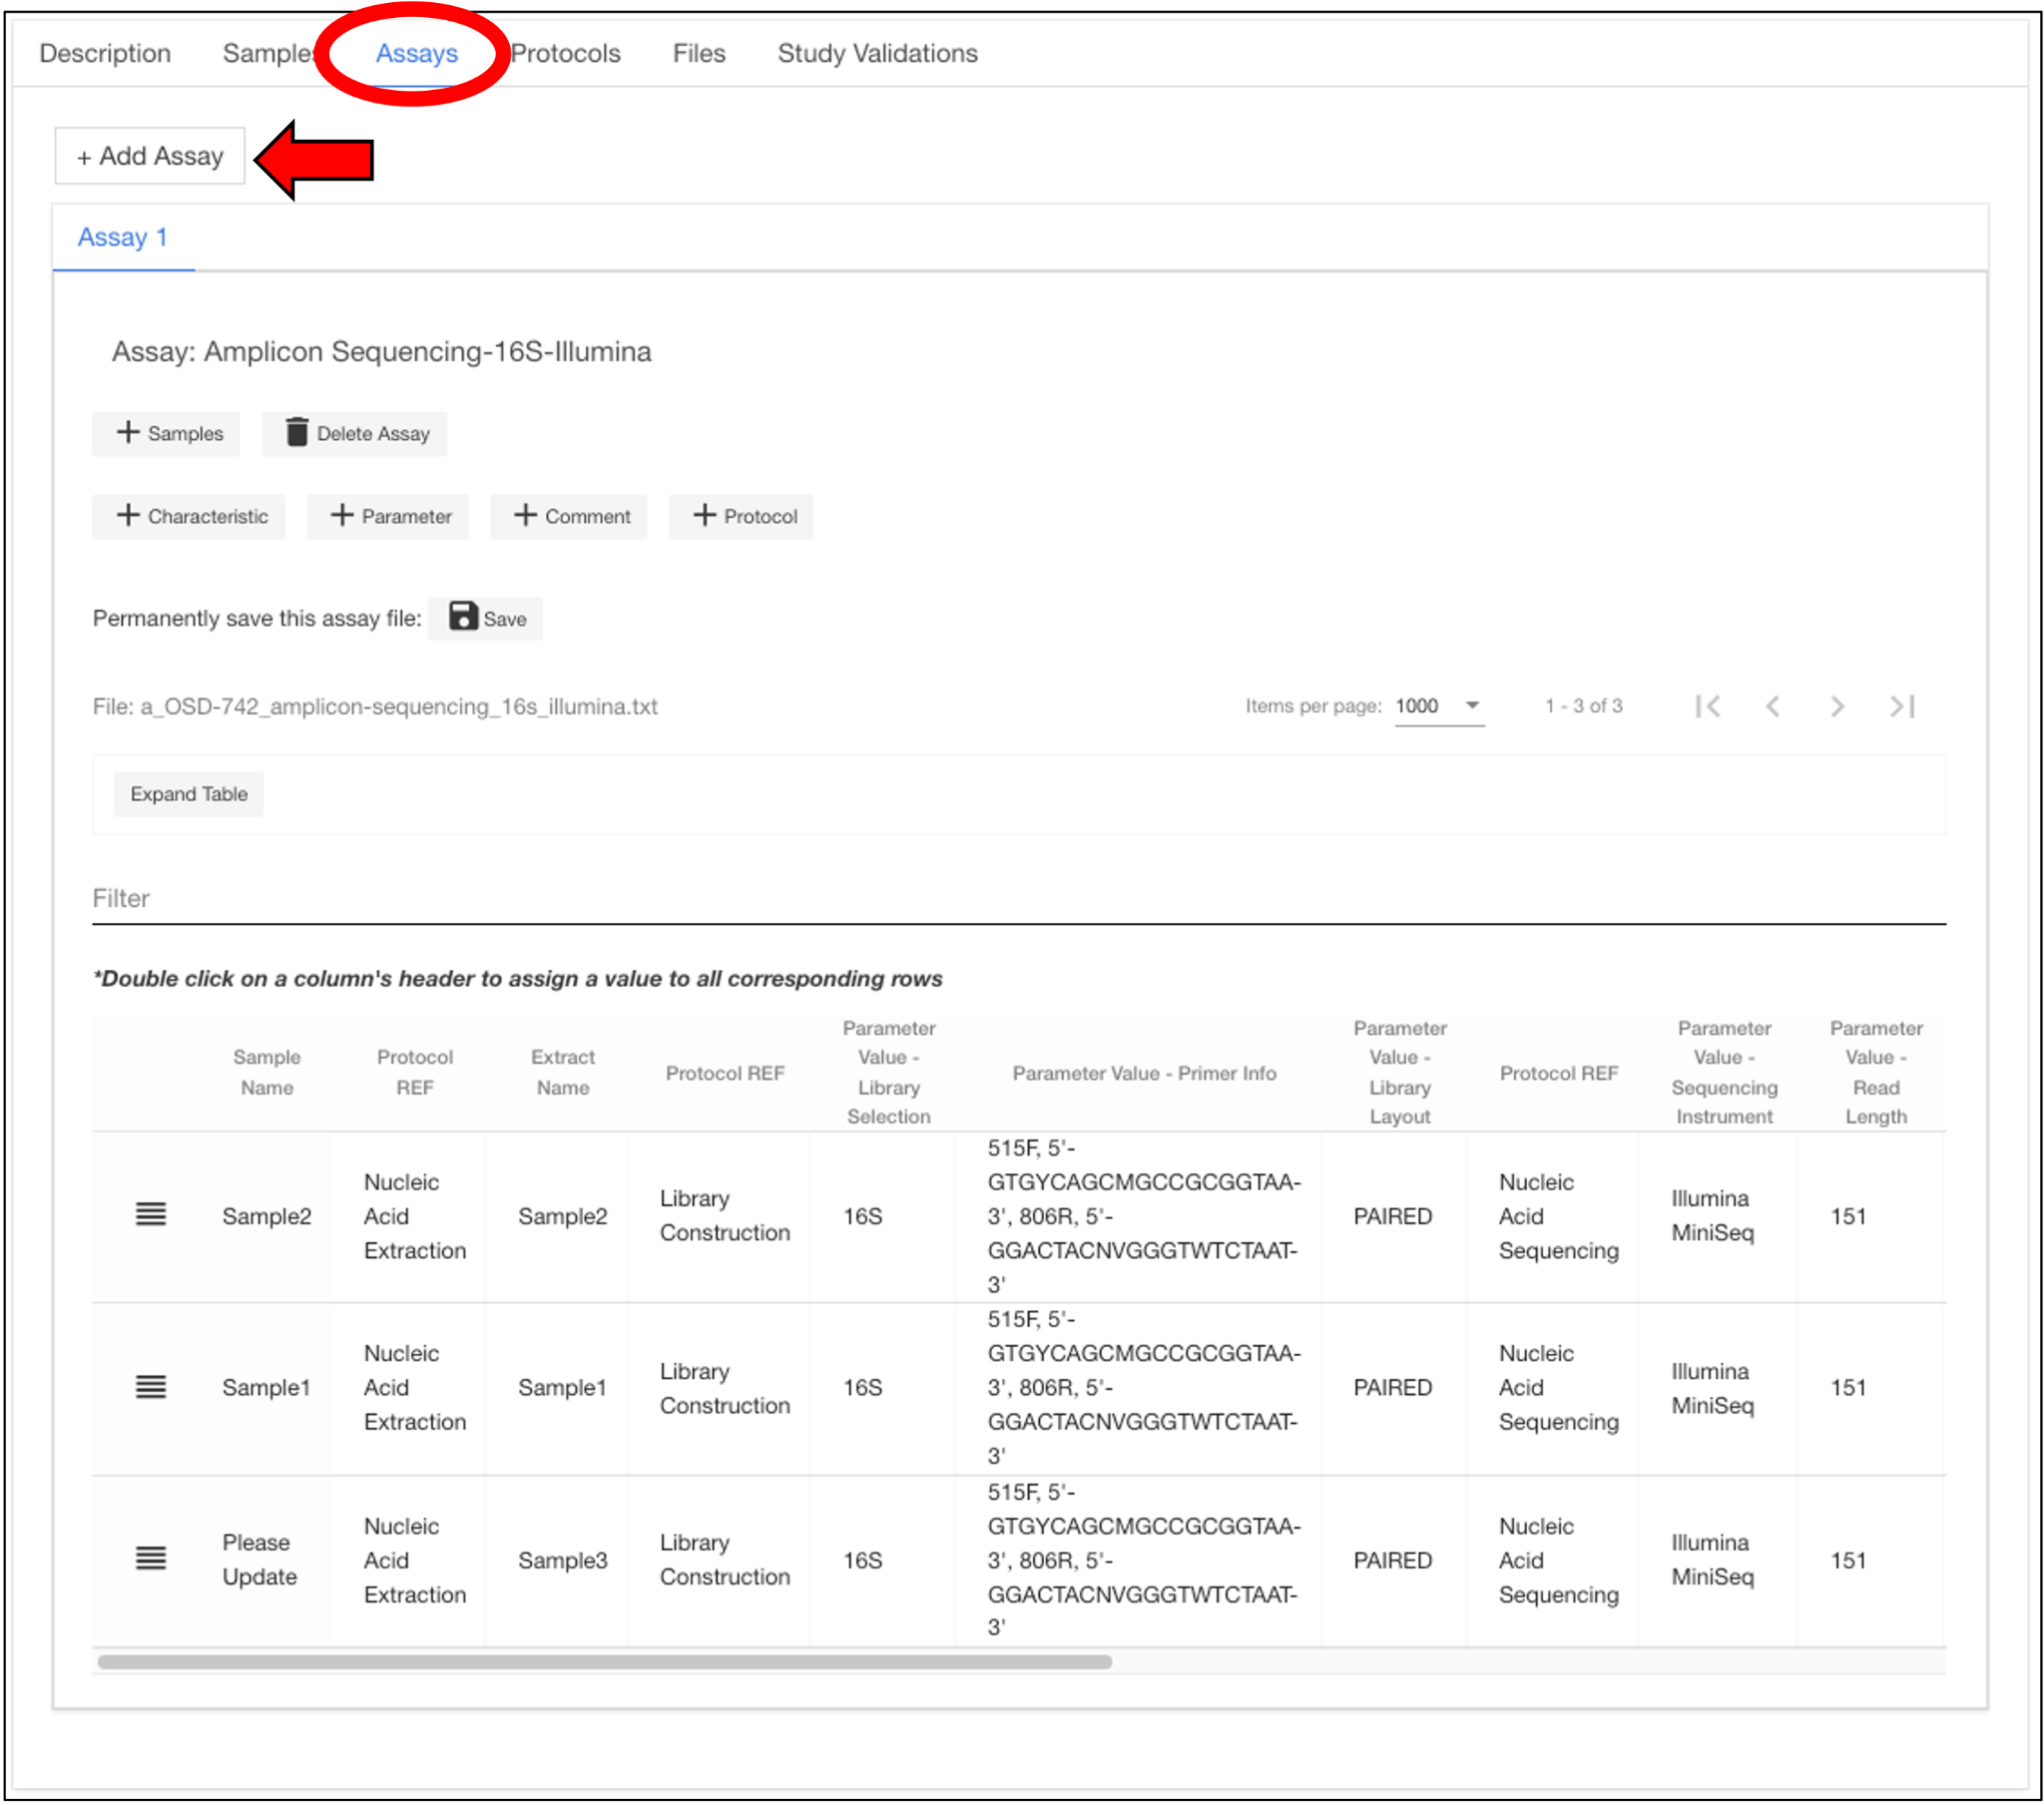
Navigate to the Assay section of the study overview and modify or complete missing assay-level information for each assay table. You may also add additional assays by clicking the “Add Assay” button.
Note: Whole columns and rows can be copy and pasted from an external template.
Navigate to the Protocols section of the study overview and modify or complete missing information for the sample preparation protocols and each assay protocol. You may also add additional protocols by clicking the “Add New Protocol” button.

Navigate to the Files section of the study overview to associate additional files for each assay. Use the “Resource Category” drop-down menu to select the appropriate assay, then select the files you want to associate from your workspace and click “Associate”.
Note: If you do not see your files, click the “Refresh” button.
After adding all missing info for the Description, Samples, Assays, and Protocols sections of your study and associating all data files for each assay, click the “Save Metadata” button on the side panel of the study overview page to save all changes.

Navigate to the Study Validations section of the study overview and make sure all sections are green, indicating they are complete. Sections labeled in red indicate missing or incorrect information, click on each of the red sections to complete or correct the information.

If you made any changes in step 18 then repeat step 17 to save your changes.
If you want to change the release date of your study, click on the “Release Date” button on the left side panel of the study overview page and select an alternate release date.

Study Preview
Once you have completed all sections, click on the link at the top of the study overview page to view a preview of what your study will look like on OSDR.
Note: This is your private study link that can be shared with collaborators and reviewers.

Submit completed study to OSDR curation team
You are now ready to submit your study to the OSDR curation team for review by clicking on the “State Submitted” button on the left panel of your study overview page and selecting “In Curation” followed by “Confirm”.
Note: Once you submit your study to curation you will no longer be able to make changes.

The OSDR curation team will reach out to you with any questions. If you need to make changes, you can e-mail the OSDR Curation team at arc-dl-osdr-data@mail.nasa.gov.
The OSDR curation team will wait to receive confirmation from you before releasing your study.